What do you guys think about this? Is it a viable option? It is outrageous? Is it brilliant? Leave a comment, let us know what you think!

Monday, June 30, 2008
Sunday, June 29, 2008
Marisa's CSA Week #2

This week was the same produce as last week, with the exception of a mystery bag. If you remember my friend Tressa and I are splitting the share, and neither of us knew what the mystery 'green leafy thing' was. Last week we got a handy dandy note telling us what was included, but this week, nothing. The mystery 'green' will just be thrown in wherever you would throw in green leafies, I guess.
Tressa used the recipe below last week to use up her Tatsoi, she said her kids just kept eating it and eating it, so apparently it is kid approved, and since it is fresh, green and healthy, it is mother approved as well. I will have to try it out on my kids because Tressa's kids are exceptional when it comes to eating healthy. Get this! Instead of an Easter Egg Hunt each Easter, her kids go on a canned fruit hunt, and they love it. My kids will put this recipe to the test and I will let you know how it is recived.
Browned Butter Pasta with Tatsoi
Serves 2
Your pasta of choice, preferably curved or with ridges
1/2 stick unsalted butter
Salt and pepper
Leaves of 2 to 3 bunches of tatsoi, rinsed
1/2 cup chopped sage
Freshly grated parmesan
Lemon wedges, optional
Cook pasta to al dente in salted water.
When pasta almost done done, melt butter in a skillet. Swirl the butter in the pan as it foams. (At this point, remove pasta from the heat and drain well in a colander.) When butter begins to brown, toss in pasta and mix to coat with butter. Salt and pepper to taste. Add tatsoi and sage and cook until slightly wilted, about 1 to 2 minutes. Plate and serve immediately with grated parmesan and lemon wedges on the side.
Friday, June 27, 2008
Daddy, where does meat come from?
Sitting at the dinner table with my small children, I discovered that they thought that meat came from animals in much the same way as milk, cheese or eggs come from animals! One son was dismayed to hear that we had to kill animals for meat. A while later, he found a booklet I have on butchering hogs. He said “Look Dad, this book shows how to make meat out of pigs!” I believe omnivores have an obligation to teach their children about slaughtering animals for meat. My children now understand it from our experience in having our turkeys and broilers dressed out by a Mennonite family. Here is a short description of the process. If you are a little squeamish, consider that this is nothing compared to the blood and gore involving humans that you have seen in the movies! 
We arrive at the Mennonite farm with our pickup load of broilers (see my earlier article). Each chicken is put into a killing cone. The head pokes through the small hole in the bottom of the cone. The jugular vein in the neck is cut and the chicken quickly bleeds to death (there is no running around with the head cut off). It is fairly painless and humane. When the chicken is dead, the head is removed and the body is dunked in a scalder - a cauldron of water heated to 140 degrees. The hot water loosens up the feathers so that they will come out easily. The chicken is then put into a picker. It is kind of like a washing machine with rubber fin gers around the sides. As the chicken bounces around, the rubber fingers knock the feathers off. With the feathers off, the chicken is hung by its feet. A slit is made in the body and entrails are removed. The heart, liver, and gizzard are saved (we chop and add them to gravy). The feet are removed and the carcass is put into ice water to cool it down. The heart, liver, and gizzard are put back into the carcass and the carcass is packaged in a plastic bag. The bagged chickens go into Coleman coolers in the back of the pickup where the broilers were cackling just a few minutes before. The whole process takes less than 5 minutes per chicken.
  Industrial processors use similar methods, just more efficiently.
If you choose to be a vegetarian for whatever reason, I certainly am not going to argue about it. I was a vegetarian for one year because I wanted to have that experience. I am glad I did it and I think there are many merits to a vegetarian diet. If your family eats meat, I think there is value in understanding and accepting the slaughtering process. Note that I still have a Mennonite family dress my chickens and turkeys for me.
~Dale Maurice Johnson
Thursday, June 26, 2008
Echinacea
 Echinacea can also be called the purple coneflower. I just love it's dramatic look and it's vibrant pink hue. I just got my first bloom on my echinacea plant and I can't wait for the others to bloom. When the bloom is more mature, the color will be more vibrant, the petals will drop so they are pointing down, and the center of the flower will form a nice round spiky mound. Echinacea does really well in areas that don't get much water. Since I don't have a sprinkling system, I like plants that are drought tolerant.
Echinacea has also been known to help the immune system fighting off infection such as colds. I have never dug up the roots and tried it, but I have taken Echinacea in pill form when I feel a cold coming on.
~marisa
Tuesday, June 24, 2008
Snips, Snails and Grasshopper Tales
 Here’s a picture to get the brain cells ticking . . .
Q: Which insect on this pink zinnia could succumb in a cloud of bug spray – the fuzzy, pollinating bumblebee, or the destructive grasshopper?
A: BOTH!
How important it is, then, to be mindful of the entire ecosystem when dealing with pests in our backyard farms. A healthy landscape’s stage has room for all sorts of players. Even the pesky bugs have a role as food for songbirds (or chickens!). Yet when pests become divas, demanding center stage and literally chewing the scenery, it’s time for a new direction.
Sarah already shared some great non-toxic bug blasters , and Michael gave us the recipe for a homemade bug spray. Here are some more ideas for protecting your plants.
SLUGS AND SNAILS
Shiny, silvery trails are the snail’s calling card. Since these critters prefer cool, moist areas, it’s often just a matter of altering the garden’s habitat. Remove any fallen, dead leaves, or similar “litter” from the base of your plants that may shelter the snails and their eggs.
Provide barriers. Make collars out of paper tubes, paper cups or tin cans opened on both ends and slip these around your plants at ground level to keep snails from crawling to the main stem. Similarly, keep berry and vegetable foliage off of the ground so snails can’t climb aboard.
Trap the slimy things in slightly damp rolls of newspaper strategically placed in your garden. They’ll go inside during the day for respite from the heat.
Remove slugs and snails by (gloved) hand whenever you see them. Note I didn’t say kill them by hand. (Please use a shovel or shoe!) I’m not a fan of that snail shell crunch, if you know what I mean. As much as I dislike snails for how quickly they can decimate a garden, I once included them in a brief, but heartfelt, burst of empathy for all creatures. So I carried them to the birdfeeder instead! Let nature take its course. Alternately, never underestimate that lost shaker of salt.
GRASSHOPPERS

Cilantro and calendula are said to keep grasshoppers at bay, so try planting them next to your vegetables.
You can spray grasshoppers directly with a 1:8 mixture of black strap molasses and water. This blocks their pores, smothering them. Or, lure them to a drowning death by putting the same mixture inside jars or cans buried so the open top is at ground level. Replace mixture as needed. These ideas come from Golden Harvest Organics, www.ghorganics.com.
Birds and cats are fierce grasshopper predators. I hope, this summer, that my children will be too. I figure that paying them a penny for each grasshopper they catch will be a win-win situation. The children will get exercise, boredom will be abated, and plants will be protected. Sounds great! All I’ll need to do is discreetly dispose of the jar.
Jennifer
Monday, June 23, 2008
Upside Down Tomato Update
The upside down tomato seems to be doing well. The poor little thing really really wants to grow right side up, and I commend it for trying, but eventually, gravity is going to win out.
 As for the tomato I planted in the ground, she has definately seen better days. It is a mystery what actually happened to this one, the stem was broken, I tried tying it to a stake in the ground, but it was 'fruitless'. So, it looks like just after 2 weeks, upside down tomato won the experiment. Not exactly the results I thought it would be, and I definately didn't expect to be done with the experiment this soon. Luckily I have 2 other brandywine tomato plants just like it, that I can compare to the upside down tomato. But, to be fair for the experiment, the upside down tomato won.

Click here to view the original post on upside down tomatoes.
~marisa
 As for the tomato I planted in the ground, she has definately seen better days. It is a mystery what actually happened to this one, the stem was broken, I tried tying it to a stake in the ground, but it was 'fruitless'. So, it looks like just after 2 weeks, upside down tomato won the experiment. Not exactly the results I thought it would be, and I definately didn't expect to be done with the experiment this soon. Luckily I have 2 other brandywine tomato plants just like it, that I can compare to the upside down tomato. But, to be fair for the experiment, the upside down tomato won.
Click here to view the original post on upside down tomatoes.
~marisa
Sunday, June 22, 2008
CSA (Community Supported Agriculture) Week #1

This weeks CSA included about 4 lbs of each:
Red and Green Lettuce: great for fresh salads and sandwiches
Tat Soy: Good in a stir fry
Mizuna: Used for adding flavor to salads
Arugula: Great in a salad, and my husband found a recipe for Arugula Pesto Sauce, I can't wait to try it.
Radishes: Great in salads or just eating by themselves.
Luckily our friends Tressa and Steve are splitting our full share with us, otherwise we would be giving away a lot of produce. Pictured is the full share, half of which went to our friends. The total cost per week for each of us, averages out to $11, not bad for an abundance of freshly picked naturally grown produce.
Friday, June 20, 2008
Net Earnings

Forget about the early bird getting the worm. It's your strawberry patch he's after!

Birds have an uncanny knack of finding the red, ripe berries before you do. See, the green one is untouched. But unlike tomatoes, strawberries must ripen on the vine and cannot be picked when green.
The best thing to do is to cover your patch with some sort breathable material that lets in light and water, but keeps birds out. Commercial products, called floating row covers, are available for this purpose. You can find many options online, including this one:
www.veseys.com/us/en/store
Most of the commercial row covers are sold in long lengths -- the shortest I found was 6 by 20 feet.
If yours is a small patch, or if you'd just like to try some do-it-yourself options, read on:
I made two kinds of strawberry nets, one with cheesecloth and another with tulle that I had left over from some party decorations.
I bought the cotton cheesecloth at the grocery store for $3. I imagine that dimensions vary with the packager, but my piece measured 3 by 6 feet. I gently draped it over my several plants, anchoring it to the ground on the edges with rocks or bricks. Mosquito netting, available at some discount stores, would also work great.

You can put a tall, heavy object in the middle of your patch, such as a cinder block on end, if you wish to keep the cloth from touching the plants.
The tulle I had is only 6 inches wide. I used it more as a protective "scarf" than an overhead net. I wrapped it a couple of times around the cluster of green berries and blossoms, but did not cover the leaves.

Truth be told, this method arose out of necessity, because my piece of cheesecloth wasn't big enough to reach a few straggler plants. Yet, I think that it can have an added benefit of keeping the berries off the ground (where they are more susceptible to rot), since you can wrap them from all sides and make a little hammock. This method is also less conspicuous than a large net or row cover.
More thoughts about strawberries: There are basically two types, June-bearing and everbearing. Whichever type, to encourage strong plants the first season you plant them, pluck off blossoms before they form berries. (I know that's hard!) You want the plant's energy to initially go into strong roots and structure rather than in producing fruit.

Soon, strawberries will shoot out runners like crazy. This is a fun way to grow more plants, but at the cost of fruit production. Decide which you want right away: bigger strawberries and more of them, or more plants.
If you keep runners you can guide them where you want. even burying them a bit to help them form roots sooner. When your alloted patch is already bursting with plants, but you want more elsewhere, try this trick: Put a dirt-filled pot right in the patch and nest a strawberry runner there. (You may need to use a J-shaped piece of wire to hold the runner in the pot.) After a week or so, check to see if the baby plant is firmly rooted in your pot. When it is you can cut the runner from the mother plant.
~Jennifer
Wednesday, June 18, 2008
Bug Spray
I love to read and the great stories always have a Hero that always tries to overcome the memorable Villain. Sometimes, if the villain is entertaining enough, my dark side roots for him. However, when it comes to my garden I don’t root for the villain, ever. Following is a homemade bug spray that allows me to eradicate the villains of my garden without getting rid of the heroes.

To make the spray you will need a spray bottle that has been washed thoroughly, water, rubbing alcohol, and liquid detergent.

Fill the bottle 85% full with water.
Add a dash of soft soap like Ivory Liquid Dish Soap, Castille Soap, or Murphy’s oil soap.
Then fill the remaining 15% with rubbing alcohol.

 Mix and then spray on a few vegetables to test them and make sure it won’t harm them. After spraying wait a day and check your plants. If they look OK go ahead and spray all of your vegetables. It is better to do this at dusk or at dawn when the sun isn’t as strong so your leaves don’t burn.
You may be asking what this concoction does. Well the soap penetrates and clogs the insects body membranes which kills them on contact. This works on the villains of the garden like spider mites, aphids, mealybugs, and whiteflies. The alcohol in the mix also kills these soft bodied bugs on contact.
Since this only kills bugs on contact, spray this on your plants 2 or 3 days in a row to make sure you get as many of the bad guys as possible. After spraying this on and giving it a little time to do it’s work, it is also a good idea to then rinse off your plants. The nice thing about this mixture is that it will dissipate and won’t linger to harm your good bugs.
~Michael
Monday, June 16, 2008
Yarrow
Yarrow, I think it is one of my new favorites in the flower bed. Last year after hearing that the plant named yarrow did well in this area, I decided to plant some. I stuck it right up front and center in the flower bed, as weather started getting warmer this year, the yarrow started getting bigger and bigger and was blocking more and more of my plants behind it. I couldn't take it anymore and decided that it had to be moved. I dug it up, split it in two and replanted in the back of the bed. Expecting it to go into a bit of shock after the trauma, I made sure to keep it moist for the last few days. I wouldn't have been surprised if it had died all together with the warmer temperatures we have had, as it is not recommended to transplant or divide plants in June. Generally this is reserved for spring or fall depending on the plant. To my amazement, the yarrow didn't even skip a beat, it looks healthier than ever, and looks so much better in the back of the flower bed. Yarrow also attracts Syrphid flies which eat large quantities of garden pests including those nasty aphids.
 A friend of mine started chemotherapy on Friday and I wanted to do a little something for her besides the same old cut flowers from the grocery store. I cut a few stalks of the yarrow flowers, placed them in a mason jar, and tied a bit of vintage ribbon around it. It turned into an adorable little flower arrangement. I liked it so much, I made one for myself as well.
Yarrow is great for fresh cuttings but also dries extremely well. Just cut the stalks before the color gets sun bleached out and hang it upside down in a dark area.
Not only is Yarrow great for adding color in your flower beds or maybe in an arrangement by your bedside, it also has some medicinal uses as well.
A friend of mine called me the 'witch doctor' the other day. His son had fallen off his bike in front of my house and was bleeding. I quickly ran and grabbed a piece of yarrow for him to place on the cut and it immediately quit bleeding. It has been nicknamed 'nosebleed' for its ability to stop bleeding. Make a tea out of yarrow to fight off those nasty colds. Yarrow can also be used as a diuretic and to lower blood pressure.
- 1 pint jar with tight fitting lid
- 1/4 cup dried, coarsely ground yarrow
- a half and half mixture of grain alcohol (Everclear) and spring water.
Yarrow grows best in zones 3-8
Get out there and plant some Yarrow!
~marisa
 A friend of mine started chemotherapy on Friday and I wanted to do a little something for her besides the same old cut flowers from the grocery store. I cut a few stalks of the yarrow flowers, placed them in a mason jar, and tied a bit of vintage ribbon around it. It turned into an adorable little flower arrangement. I liked it so much, I made one for myself as well.
Yarrow is great for fresh cuttings but also dries extremely well. Just cut the stalks before the color gets sun bleached out and hang it upside down in a dark area.
Not only is Yarrow great for adding color in your flower beds or maybe in an arrangement by your bedside, it also has some medicinal uses as well.
A friend of mine called me the 'witch doctor' the other day. His son had fallen off his bike in front of my house and was bleeding. I quickly ran and grabbed a piece of yarrow for him to place on the cut and it immediately quit bleeding. It has been nicknamed 'nosebleed' for its ability to stop bleeding. Make a tea out of yarrow to fight off those nasty colds. Yarrow can also be used as a diuretic and to lower blood pressure.
Yarrow skin treatment for itchy skin
You will need:- 1 pint jar with tight fitting lid
- 1/4 cup dried, coarsely ground yarrow
- a half and half mixture of grain alcohol (Everclear) and spring water.
Place the herbs in the jar, and fill the jar to the shoulder with grain alcohol - spring water mixture. Cover tightly. Store at room temperature, protected from light and heat, for 4-6 weeks. Shake vigorously every few days. After 4-6 weeks strain the mixture through a clean cotton cloth in a colander or strainer. Squeeze to remove as much liquid as possible. Discard the plant material and store the liquid in a dark glass bottle. This preparation will keep at room temperature indefinitely. Apply to itchy areas with a cotton ball.
(recipe found on www.seedsofknowledge.com)Yarrow grows best in zones 3-8
Get out there and plant some Yarrow!
~marisa
Sunday, June 15, 2008
Thursday, June 12, 2008
A Look at a Chicken Coop
One of our readers, Damon, had an interesting idea for a chicken coop that I thought I would share. He is using part of an existing shed in his backyard. The outside run was built with some lumber and chicken wire. He said that this setup is temporary until he comes up with a better idea, but I think it is great! 
The nests are inside the shed with a ramp leading up to it. Damon says, "The box with the stalls (and holes drilled in them so the birds can talk) is where I plan to have them lay eggs. I don't know what the problem is but they don't seem to like the enclosed box where they lived as chicks. The hole that goes outside from there is 7 inches square. I hope its not too small. I may have to make it bigger."
As you can see there is a door with a latch so he can easily access the eggs in the nest. I'm assuming he keeps the feed and cleaning supplies for the chickens all in the shed as well which would make for quick and easy feedings and cleanings. Damon said, "This is my first attempt at chickens and eggs. I just want them to live." I think he has a great setup, some good looking birds, and will have a lot of success with his city flock of hens. Thanks Damon for sharing your endeavors in backyard farming with us.
 If you would like to share any of your ventures in backyard farming please send your pictures and a description of what it is to backyardfarmingblog@gmail.com.
~marisa

The nests are inside the shed with a ramp leading up to it. Damon says, "The box with the stalls (and holes drilled in them so the birds can talk) is where I plan to have them lay eggs. I don't know what the problem is but they don't seem to like the enclosed box where they lived as chicks. The hole that goes outside from there is 7 inches square. I hope its not too small. I may have to make it bigger."
As you can see there is a door with a latch so he can easily access the eggs in the nest. I'm assuming he keeps the feed and cleaning supplies for the chickens all in the shed as well which would make for quick and easy feedings and cleanings.
 Damon said, "This is my first attempt at chickens and eggs. I just want them to live." I think he has a great setup, some good looking birds, and will have a lot of success with his city flock of hens. Thanks Damon for sharing your endeavors in backyard farming with us.
 If you would like to share any of your ventures in backyard farming please send your pictures and a description of what it is to backyardfarmingblog@gmail.com.
~marisa
Tuesday, June 10, 2008
Broilers
 Today is slaughter day. So let me tell you all about broilers. Broilers are a hybrid chicken bred for fast and efficient meat production. The original root stocks are White Cornish and Barred Rock breeds – hence the common name of “Cornish Cross”. Americans on average eat 90 pounds of chicken per person per year – that is 27,000,000,000 pounds total! Almost all chicken is raised in highly-efficient, industrialized broiler houses. Unlike my opposition to what I consider inhumane industrialized layer houses, I am not apposed to broiler houses. Chickens only spend 8 weeks in these boiler houses and I believe that they are reasonably humane.
  But I have great satisfaction in having produced some of my own meat. Here is the story of this year’s production. On March 14 my wife, LeAnn, went to the County Extension Office to pick up the 25 chicks that we ordered. (We get them as part of a 4H project.) That would give us enough for Sunday dinners through the year considering we rotate chicken, beef, and pork. LeAnn called me from the Extension office and said that Larry, the County Agent, wanted to talk to me. Larry got on the phone and said “Dale, we have a few extra chicks we would like you to take.” I said “How many?” Larry said “200” I said “NO!!! Let me talk to LeAnn.” I warned LeAnn not to take any more than 50. We got the 50 home and over the next few day several died, which is not unusual. We finally got around to counting the chicks and after the death loss, we still had over 60. Larry stuck us with more than we asked for (at the cost of 50 so I wasn’t too upset.).
 We start the chicks in the garage and finish them in a horse stall in the barn. Our pasture pens wore out and I haven’t gotten around to building new ones. Today, May 25, 74 days later we took 49 to be processed by a Mennonite family. Our death loss was unusually high this year. At 10 1/2 weeks we grow our broilers to heavy weights from 5 to 10.5 pounds dressed weight. Our total weight for 49 broilers was 410 pounds. Our upright freezer is full (and so is our neighbor’s).
I do not encourage urban farmers grow broilers. It is not worth the effort unless you grow a considerable number like we do. If you want to have chickens, then get layers. Egg production is much more fun and economical than meat production. Broilers are ugly. They have oversized breasts and feet. They clumsily waddle around. They stink. They have very wet manure in comparison to layers. It has to do with the genetics and the hot feed that makes them grow fast. Even bedding them every day does not mitigate the smell. And then you have to dress them (interesting terminology) or find someone to do it for you. You only have to worry about dressing layers after 2-3 years.
Here are the economics for my 49 broilers:
Chicks @ $0.50 each (4H price), $25
Feed, 1350 pounds, $305
Heat bulb, $7 (They break every year)
Slaughtering fee, $113
Gas for pickup , $20
Total, $470
Cost per pound $1.15
Buy your chicken meat in the store and focus your backyard farm on layers and a vegetable garden. But I have a great satisfaction in putting a roasted chicken that I produced on my Sunday dinner table.
Dale M. Johnson
Sunday, June 8, 2008
Book Review: Country Wisdom and Know-How: Everything You Need to Know to Live Off the Land
 I have always had a dream of living on a farm somewhere out in the country. A farm like Old McDonald's with cows and ducks and chickens a plenty and rolling hills for my family to roam. If I ever had a night were it was hard to fall asleep I'd ask my husband Mike to tell me about our future farm and how great it was going to be. It was a beautiful dream but I didn't see how it was ever going to happen until I found this book.
I was on a date with my husband, wandering around a big bookstore, when I happened upon it. I opened it up and was immediately hooked. I made him agree to buy it and I took it home and poured over it's pages. The next day I called my friend Marisa and told her she needed to buy it too - which she did not too long afterward.
 This book is a compliation of a series of publicatoins from the 1970's when the movement to get back to the land was having it's first revival after the mechinized 1950's. These little books included step by step instructions on literally EVERYTHING you need to know to live off the land including baking basic bread, braiding rugs, breeding livestock or growing the best tomatoes. It includes 1,887 illustrations, diagrams, and photographs which are easy to understand and totally applicable - the editors updated all of the information for this publication. Each article is easy to read and geared towards people with little or no experience. I have been able to turn to it when I had questions about pests in my garden, chickens, or even for herbal remedies and recipes! The book is divided into 6 sections: Animals, Cooking, Crafts, Gardening, Health and Wellbeing, and Home. This book rarely gets to sit on the bookshelf because even when I don't have questions I just love to read about things and dream that someday I'll get to do them. I've enjoyed articles on how to choose your land when you're in the market to purchase, how to make and use a flower press, or how to build a root cellar. The list goes on and on. So, in the end, if there is a book that every backyard farmer should have - this may be it!
~Megan
Saturday, June 7, 2008
Thursday, June 5, 2008
The Gift of Perspective

Through a child's eyes, everything is beautiful and worth sharing.
Taking part in a rec
 ent neighborhood cleanup, a group of us remarked that from a distance the flowerbeds we were asked to weed looked pretty good. Only when we got up close did we notice all the fallen twigs beneath the bulb foliage, the smothering layer of matted leaves no perennial could burst through, the singularly stubborn blades of errant grass.
The devil's in the details, so the saying goes. Suddenly there was a lot of work.
But it was a beautiful morning, and as I walked home afterwards I considered the time well spent. I rounded the corner to my street. As I got closer to home my eyes played tricks on me. The farsightedly homogenous patches of green in my yard shifted into distinct forms, and -- oh, no! -- there were lots of WEEDS!
I walked around my yard, front and back, my eyes simply the window office for a
 furious little taskmaster list-maker in my head. Oh, just look at all that has to be done! I lamented. Dandelions, bindweed and clover, oh my! I'll never catch up.
What had happened? Of course, bionic or not, the weeds had been there before I left that morning. Why, all of a sudden, were the details so distressing to me?
I worked through the afternoon, hardly making a dent, I thought. The next day I sauntered into the shady backyard. It was a day of rest. Besides, the dress I was wearing almost kind of sort of stopped any chance of my picking up a shovel. I sat on my lawn just to enjoy the blue birds and yellow-striped finches flitting from crabapple blossom to pine tree branch. I leaned back, dismissed the weeds I saw and instead counted how many new raspberry starts have emerged.
You know, details.
Wait . . . Marvelous, glorious details.

Thoroughly refreshed, I had an epiphany of sorts. I love working in my garden because of the progression. Further, being on the gardening frontlines gives me an unparalleled view of nature. It is when I'm tending to the undesirable aspects of gardening, like weeding, that I tend to notice the grandeur of the small stuff.
Long live gardening chores! It would be a shame if I ever got caught up.
(These images are from my yard this spring. If they weren't so darn close up you'd see plenty of weeds lurking in the background, but who's telling?)
~Jennifer
Wednesday, June 4, 2008
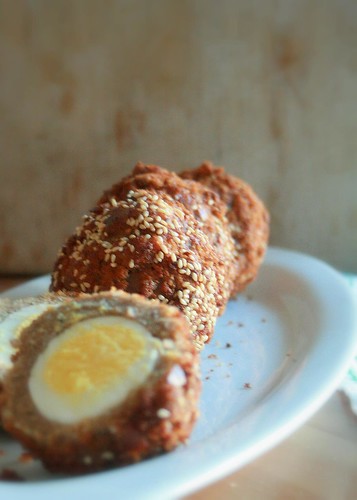
Egg Recipe Winner: Vegetarian Scotch Eggs: Submitted by Sugar Magnolia
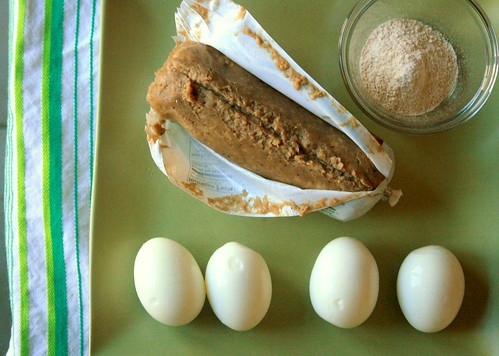
For four hearty Scotch Eggs:
- 4 organic eggs hard-boiled and chilled
- 1 package of fake sausage or regular sausage, if you prefer
- 1 clove of garlic, minced
- mixed herbs to flavor bread crumbs
- fresh or otherwise bread crumbs (fresh, from 3 slices of sandwich bread was enough for me)
- 4 Tbsp sesame seeds
- 1/3 cup flour
- 2 raw eggs, lightly beaten
- vegetable oil, for deep-frying

Remove egg shells, and rinse with cool water. Maneuver the sausage to enclose each of the eggs. Combine garlic, herbs, bread crumbs & sesame seeds on a plate or shallow bowl. Lightly dust the sausage-covered eggs in flour, dip in raw eggs, and coat with bread-crumb mixture. Heat about 2 1/2 inches of vegetable oil to about 350°. With a slotted spoon, drop 2 eggs in at a time, cook 4-5 miuntes or until browned and sausage is fully-cooked. Drain off some of the extra grease (or not! we’re living large here, right? ![]() and enjoy. Cheers!
and enjoy. Cheers!
Tuesday, June 3, 2008
Nontoxic Bug Blasters
.Do you ever bring home fruit flies from the super market? If so simply mist the fruit flies with a spray bottle filled with rubbing alcohol. They will fall to the floor and then you can sweep them up.
.Seems like certain times of the year sugar ants march a trail along the counter tops, but now they don't have to. Squirt some lemon juice into any holes or cracks where the ants are getting in, and scatter lemon peel around the outdoor entrance. The ants should get the message.
.Sprinkling cayenne pepper or borax at the point of entrance will also keep the ants and insects from entering your casa.
.If you have roaches mix equal parts of sugar and baking powder over the infested area. The sugar will attract the roaches, but the baking powder will kill them. Replace the mixture frequently.
.Want to get rid of anthills in the backyard? Pour vinegar over them. Viola~
.Vinegar can also be used as a mosquito repellent. Simply moisten a cotton ball with vinegar, rub it over your skin and keep the mosquitoes and gnats at bay.
.Is a pesky mosquito bite itching like crazy? Simply wet a cotton ball with ammonia (or Windex ) and rub it on the bite. The itch will be alleviated.
.Cedar, cedar, and more cedar. Cedar chips in your closet keep moths from eating your lovely sweaters. Fresh cedar mulch helps repel many pesky insects away.
.Remove dog ticks by first rubbing the tick's back with rubbing alcohol, and then grab the tick as close to the dog's skin as possible and pull it straight out with tweezers.
.Slugs are lushes. Place shallow pans of beer in the flower bed next to slug munched flowers, and in the morning you should see "wasted" slugs.
.Insecticidal Soap: In your garden you can spray insects feasting on your pretty plants with a simple concoction of 1 tablespoon of (non-phosphate) dish soap mixed with 1 gallon of water.
Sunday, June 1, 2008
Upside Down Tomatoes
I've been reading about upside down tomato plants recently and thought I would give it a go. This might appeal to you if you live in a space where you only have a balcony, or don't want to tear up your lawn to plant a garden. Neither of the cases apply to me, but I wanted to see for myself how this actually works. Some critics of this method say that they don't produce as much, don't get as much leafage, and tend to dry out quickly. So, I've decided to do an experiment, I'm going to compare two identical plants, one planted upside down and one planted in my garden. I chose to use two heirloom Brandywine tomato plants that I started from seed. 

Now, you can buy fancy expensive gadgets to hang your tomatoes, but I have also seen a site where it was done in hanging planters like this (but I never saw the end results). I also found a site that explained how to make them out of a 5 gallon bucket, but it just didn't seem as aesthetically pleasing to me.

I started by tearing a hole in the bottom, not too big, but big enough to get the root ball through it.

My husband and I debated on which end to push through the hole, my vote was to push the roots through instead of the leaves. I won, because this is my article after all!  Some of the roots got smashed and broken up, but I do a little of that anyways when I transfer a plant. I still think my way was the better idea!
I repositioned some of the brown 'stuff' around the base of the plant so it wouldn't fall out.
 Some of the roots got smashed and broken up, but I do a little of that anyways when I transfer a plant. I still think my way was the better idea!
I repositioned some of the brown 'stuff' around the base of the plant so it wouldn't fall out.

Next, I just filled the top with potting soil and gave it a sprinkle of water. Man was it heavy.

Make sure you have a spot prepared to hang it before you start your project. My arm was about to break off, and it is still sore from holding if for so long (if you put it down, you smash your plant). Luckily we found this little screw in the fence to hold it temporarily until we got up something permanent.

Here is the twin, planted in the garden. I will keep you updated on how this experiment is going.
 I will keep you updated on how this experiment is going.
~marisa
Subscribe to:
Posts (Atom)