Looking for Something?

Friday, July 31, 2015

CSI: Raspberry patch

Raspberries are fairly easy to grow, but they can fall prey to certain pests and conditions. Here's an incident report from recent activity in my patch. 


1. The evidence: Shredded ripe berries next to next to untouched unripe berries.

Further investigation: One morning after picking a few berries I was surprised to notice little black bugs scampering inside the bowl of fruit I'd picked. I hadn't seen them on the outside the berries at all when I harvested. I looked more closely as I picked the next few, and lo and behold, it was like clowns piling out of a Volkswagen.

The culprit: Beetles that go by the name picnic or sap. These 1/4-inch long bugs are attracted to ripe, decaying fruit initially, but once drawn to the garden can also harm unripe berries. Since this beetle doesn't damage the plant, it is more a nuisance than a hard-core criminal. 

Control through regular harvest and removal of decaying berries. (Source: askextension.org.)


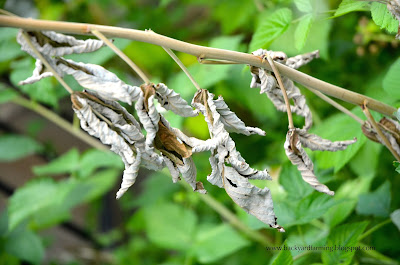
2. The evidence: Multiple reports of dry, wilted leaves.

Further investigation. Pay attention to the scope and spread of wilted leaves to be able to pinpoint the perpetrator. For instance, the above picture shows some dried leaves in the middle of an otherwise healthy cane. It was most likely caused by water stress at the time those affected leaves unfurled. Pluck off the dried leaves and you're good to go.

In contrast, the picture below is of thoroughly dried out cane, surrounded by other healthy canes. Such isolation suggests the presence of a pest within the cane, not a widespread water or soil issue. A raspberry cane borer is the likely suspect. The adult females poke holes in the canes in spring and lay eggs. After the larvae hatch they tunnel downward toward the roots to overwinter. (Source: organicgardening.about.com).

Control by removing affected canes. Discard or burn rather than compost, to ensure any critters inside the canes don't get out on parole for a new generation of pests next season.


3. The evidence: Holes in leaves. Again, look for different calling cards. Bite marks from the exterior of leaves signal grasshoppers. 


Holes in the middle of leaves, particularly those that go around the leaf's veins, come from caterpillars, such as the larvae of the raspberry sawfly or the raspberry fruitworm beetle. (Source: http://www.omafra.gov.on.)

Control all of these with hand-picking or an easy DIY bugspray, featured here.


By the way, the yellowing of these raspberry leaves is easily corrected through addition of iron to the soil.


4. Circumstantial evidence: Birds!

Control through netting or frequent visits from my favorite kind of raspberry thief:


Conclusion: Patrol your patch regularly and remove and destroy canes whose wilting leaves show signs of insect intruders. Harvest berries before they get overripe and attract picnic beetles to the decaying fruit. Sporadic leaf munchers won't affect production in an otherwise healthy patch, but you may chose to use insecticide or an organic spray.

Tuesday, July 28, 2015

Pregnant tomatoes!


I was amused to slice a tomato today at lunch and see bright green seedlings inside. I became a believer long ago of how easy tomatoes are to grow from seed, but come on, you guys -- this makes me wonder if tomatoes want to phase me out as a gardener altogether. :)

Monday, July 27, 2015

Repeat performance


Plant a pea seed in early spring and it will give you vines aplenty, with pods full of tender, green morsels. Let a few of those pods mature past the stage of good eating (when those peas are too big for their britches), and they will produce the seeds you can easily harvest to sow another crop. If you live in an area with a mild winter you can plant peas in late summer for a fall crop. My area has long, hot summers and long winters of yo-yo freezes and thaws, separated by the tiniest of consistently pleasant autumns -- not the best conditions for a fall pea crop. The seeds I harvest will be for next spring.

I purposely let a few pods go all the way to seed stage, especially to justify those that got overlooked for picking and nibbling. Their drying pods can hang out alongside newer pods and blossoms while the plant still produces green gems. Eventually peas succumb to the heat. When this happens I yank out the vines to give room in the garden for something else. I take a few moments to separate the browning pods before I cast the vines into the compost bin. I put the pods in a sack on my patio to dry out thoroughly. Voila, nature's seed packets.


Heirloom seeds are the best to save, as the seed will match the parent. (Learn more about heirlooms here.)

Read here for helpful, concise information on seed-saving basics.

Do any of you have great luck with second crops of peas or other plants in the fall? I would love to learn more about your conditions and what plants fare best for repeat performances months after the first.

P.S. Carie, Daisy, David and Becky -- You made Samuel's day with your comments addressed to him!  I loved hearing from you and look forward to reading more of your adventures.

Wednesday, July 22, 2015

Quail detail


As much as I think quail are charming little birds, I don't like the damage they cause in my garden. They were sneaky ... at first. In early summer I occasionally noticed a depression in the ground about three inches deep and the diameter of a salad plate. No vegetable starts were disturbed, however, so I didn't fret. It could have been caused by a burst of water from the hose, for all I knew. As summer advanced I saw new holes everyday. From what? Finally, shed feathers shed some light. Ultimately I got a sighting: this brazen specimen hung out in the garden while we ate a picnic lunch nearby. He behaved quite well, I thought.

Ah, to lull me into complacency. Up to this point I still thought quail were pleasant additions to my landscape. I was stymied but smiled when I found an egg in a garden hole one morning.* The quail went from charming to harming (tsk, "harmful") in my book the day I found holes right up against my tomato plants, exposing their root balls.

Hardly any of my bean seeds sprouted, and I wondered if the quail were responsible for that, too.

To thwart the birds I used a pile of black plastic netting, draped loosely in layers over my bean patch and around the base of tomato plants. I figured that if I spread the netting out in a single layer over the soil, the birds could still peck through the size of the grid to get the seeds. A mass of netting, on the other hand, offers 3-D protection that doesn't ensnare emerging seedlings. Besides, it was simpler than cutting and staking.


Standard conical tomato cages won't deter digging animals because the openings at soil level are still so wide. It's better to create a barrier on the ground that goes all around the plant.

I know the quail still visit. Mostly I hear them before I see them, with their helicopter-sounding takeoff a far noisier giveaway than if they just stayed put. Silly birds. These garden measures haven't hurt them but established boundaries. I love when a group of them do a frantic single-file march down the lawn or sidewalk, each following the leader's curlicue path. They are cute. As long as they play nice.

* The egg was broken the following day. Great, another critter.

Friday, July 17, 2015

We're back! An introduction and a plea to get to know you, too.


It's about time I introduce myself. I'm Jennifer, friend to Marisa, whose beautiful family is pictured in the blog's masthead. I'm excited to write and share my enthusiasm for gardening. I am far, far from an expert on gardening, but I like it a lot -- and I think (hope!) that's the ingredient that counts.

I identify myself most through my five children, ages 7 to 19, who keep me just a wee bit busy. I'm a piano teacher with dirt under her fingernails. I guess I'm a nurturer at heart, for that is when I'm happiest -- and I learned early on the benefit of mixing time in my child-rearing day to tend plants that don't talk back. Working in the garden helps balance me. I love nothing more than my dusk weeding sessions ending in a game of catch with my boy.

I have a rather laissez-faire approach to gardening: "Oh, you like to grow there?" I may think about a volunteer plant. "Ok, then, you can stay." As a result, my gardens are more wild than tidy. A reflection of my thoughts if ever there was one. (Hmm ... does this paragraph suggest I talk to plants?)

In addition to the intangible harvests of gardening I also do it because I like to eat! For this blog I will write about the growing pains and successes in my backyard farm, as well as what I learn along the way from other gardeners. I want to raise chickens someday. I weathered a change in my city's ordinance that now allows chickens for my size lot, but I still need to get my husband on board.  We live in a 50-year-old home on a steep .19 acre lot. My greatest gardening challenges are slope, space and drought. I believe in matching plants to ambient conditions and letting the whole eco-system run with little interference. I don't use chemicals, but that's mostly because I don't like having to run out and buy one more thing, you know?

When Marisa started this blog in 2008 a band of other gardeners soon gathered and shared their insights through comments. I loved this! I want to recreate a sense of community among you, our readers. I know that you can find all sorts of information through the Internet, and I value that you choose to come here.

Will you do me a favor and introduce yourself? If you also have a gardening site please leave the address in your comment so we all can pay a visit.

Plus, my dandelion-blowing son, pictured above, is jockeying for computer time. When I told him I needed to do a post first he said, "Come on, Mom. No one reads your blog." Well! Would you address your comments to him? His name is Samuel.

Thanks. Come again!

Wednesday, July 15, 2015

Considerations when buying discount plants


This is the time of year when many nurseries, home improvement centers and grocery stores unload their stock of plants at discount prices. It can be tempting to fill your cart with types and numbers of plants you normally would not buy, all because the exhilarating price seems right. Or, maybe you leap into a rescue mission thinking you can save the poor little plants no one else wanted. (Come on, admit it, you know you think that sometimes. No? Just me? OK, never mind.)

Here are some things to consider when buying plants at discount prices.

1. The source. My town sports a seasonal greenhouse that starts all its own plants from seed, sells them onsite, and then closes shop mid-summer. The nursery holds a 1/2-price sale at season's end to clear stock. I've always had high quality plants from this greenhouse; their reputation depends on it. Some nurseries have plant guarantees. In contrast, plants decking a grocery store's entrance probably don't matter as much to that retailer's overall business.

2. The reason for the discounts. Are plants on sale because they have been neglected? (Not a good sign.) Or are they surplus stock?

3. Condition of a plant. Often clerks relegate plants to the clearance shelf based on appearance alone. Is a plant just thirsty or near death? If the latter, walk away. If plants look less than ideal do you know what to do to remedy this? For instance, might you recognize that all a marked down purplish tomato plant needs is fertilizer? If so, evaluate what that is worth to you. Plant rehabilitation takes extra care, and your time is money.

If a plant appears in good shape, still take a look at the root ball to confirm plant health. Gently hold the plant in one hand and tip it over to pull the pot away with your other hand. If the roots form a rigid mass that looks like a cork, that's an indication the plant is extremely rootbound and will not transplant well. It was probably dehydrated and formed so many roots in its search for moisture.

Say you've checked and are confident you've stumbled on some healthy plants. Dirt cheap! There's more to consider:

4. Do the plants match the soil, light and water conditions in your yard? No use buying a sun lover if all you have is shade.

5. Do you have a spot available? I was excited to score a $2 bare-root rose bush at the grocery store. But my excitement has turned to embarrassment because this purchase was in May ... and the bush is still in its package in a bucket on my patio! I haven't prepared a spot yet. An inexpensive plant you never release from its pot is no bargain.

6. Closely related, do you have time to get the plants into the ground soon? Or will they, ahem, sit on the patio? Last year I bought a flat of black-eyed Susan flowers at the greenhouse (for half price, of course) then promptly went out of town. Oops.

7. How long is the growing season in your area? Will vegetable starts have time to mature if you plant them late? Will you still get blooms out of annual flowers? Keep in mind that it is harder for plants to get established in the heat of summer than in the milder temperatures of spring. All this takes time and watering attention.

Bottom line: although I joke, thinking you can rescue plants is not a compelling reason to buy them on sale. Robust plants are always a better investment, provided they also match your garden's soil, light and water conditions -- and your time as gardener. When all these factors align, bargain bin plants can be a thrill.

Tell us, have you had any triumphs with discount plants?

Wednesday, July 8, 2015

Plants to attract butterflies and bees


Butterflies are the perfect blend of form and function. Helpful pollinators, their presence in the garden also adds a beautiful touch of wonder.

A bee pollinates raspberries.

Bees, of course, are pollinating work horses -- our fruit patches and vegetable gardens could not flourish without them. Over the years I have observed that my vegetable plants do best when my yard is filled with flowers that attract the bees. The plants pictured here are all from my yard, which means they exist practically on their own, with very little help from the gardener (because I chose them for that!). They are all drought-resistant perennials.


For butterflies:

Soapwort. This plant releases a profusion of tiny pink flowers in spring. Cut back spent flowers for a second bloom in late summer. The plant spreads or cascades, depending on where you plant it -- it can be a ground cover, or will spill over planter edges or stones in a rock garden. It reseeds freely.

Swallowtail

Coneflower (echinacea). These flowers provide a platform where butterflies can land. Cut back in the fall.

Monarch


Painted lady


Lavender. Like soapwort, lavender has multiple flowers, and hence multiple treasure chests, in a close space. Butterflies and bees like this. 


Other great plants for butterflies:

Butterfly bush (buddleia) or butterfly weed, aster, black-eyed Susan (rudbeckia), phlox, zinnia.

Consider host plants for eggs and caterpillars: fennel, dill, parsley and milkweed.


For bees:

Sage. This plant's gray, green leaves are a great culinary herb. The plant blooms in spring and can bloom again if spent blossoms are cut.


Other plants for bees: herbs in blossom, alyssum (smells like honey, yum!), sunflower, salvia, bee balm. Russian sage produces huge plants (4-feet tall) with spiky wands of blue flowers. It is a bee magnet, I tell you. I used to have some of those near my sidewalk but transplanted them after a neighbor told me her daughter was fearful to walk past my house. All in a day's work!

What plants do you like best for butterflies and bees?

Saturday, July 4, 2015

Garden fireworks


Happy Independence Day! A few years back I wrote here about the memory of my 5-year-old son seeing dill blossoms in our garden and excitedly saying, "Look, Mom! A firecracker plant!"


Well, now the tides have turned, because after hours and hours working in my yard this week I'm starting to see the garden in fireworks. I'm posting these pictures soon after taking them, and since fireworks go off in the dark it's naturally rather late and ... the tired sillies may or may not be in effect.  All the same, I present my garden fireworks gallery:


Sprinkler


Reverse dandelions -- white stem and green seed heads


Birds and blue sky


Hummingbird and flower


Scarecrow


I always wondered how to get fireworks pictures that weren't a)nothing but tiny dots or b)nothing but glare. I set my digital SLR to low ISO (100) and bulb shutter speed, meaning the shutter stayed open as long as I pressed the button. These images were between 3 and 20 seconds. A tripod is helpful, although I didn't use one for these pictures.