
FYI: Depending on where you live, it may not be the proper time for you to start seeds right now. I am in Utah and will not be starting the majority of my seeds until March 15th. Please check with your local extension agent to find out when you should start your seeds!

Seed starting really isn't that difficult. It can seem overwhelming if you haven't done it before. I know it took me a few years of gardening before I dared start my own seeds. It wasn't until my husband Michael said to me,
"If the pioneers that crossed these plains could put a seed in the ground and grow food without peat pots, a bag of seed starting soil, and a mini greenhouse container....we can do it WITH those things."


A. Seeds. We prefer heirloom seeds. We like the variety that is available in heirloom seeds, as well as the fact that we can harvest seeds from our produce to use the following year. Packets of seeds you buy from a big box store will be hybrids and the seeds can not be harvested. In the long run, this saves money as you don't have to purchase seeds each year. We purchase a few packets each year to add more variety to our garden.
B. Containers. Something to hold the soil and seeds. Here are a few options.
Pellets: These start as a small hard disk, when added with water they pop right up and you can place a seed in them. These are nice because they are easy to use and small so they don't take up a lot of space.
You can place them right into the soil when you are ready, you do not need to peel off the netting around them. The disadvantage is that they are quite small and I always have to plant them in something else (like a plastic cup) before planting them outside.


Be creative. We save our yogurt containers and bring home plastic cups from parties for seed starting. It makes gardening more economical that way. For even more creative and frugal seed starting containers, check out this article. If you are recycling something like a cup, be sure to poke some holes in the bottom for drainage. About 5-6 with a thumb tack should do the trick.


Day 1: Move plants outside in the shade for 2-4 hours on a nice day.
Day 2-5: Move plants outside for 2-4 hours in the shade and one hour in the sun making sure the weather isn't too cold or snowy.
Day 6-7: Move plants outside for 2-4 hours in the shade and 2-4 hours in the sun.
Day 8-10: Move plants outside for 2 hours in the shade and 6 hours in the sun.
Day 11-12 Move plants outside for 8 hours in the sun.
Day 13-14 Leave plants outside all day and all night in the area they will be planted. Be sure that the weather overnight won't be too cold or windy.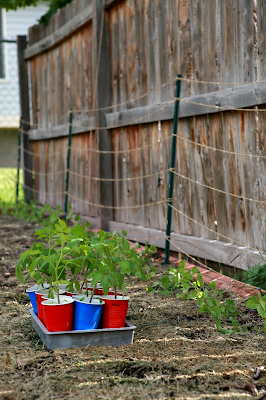


He was right, and my family is living proof of that. If WE can start plants, trust me YOU can do it too. You will see in the pictures that my kids did most of the work (aged 4, 6, 9).
Here is how!
Step 1: Gather Your Supplies
Step 1: Gather Your Supplies

A. Seeds. We prefer heirloom seeds. We like the variety that is available in heirloom seeds, as well as the fact that we can harvest seeds from our produce to use the following year. Packets of seeds you buy from a big box store will be hybrids and the seeds can not be harvested. In the long run, this saves money as you don't have to purchase seeds each year. We purchase a few packets each year to add more variety to our garden.
B. Containers. Something to hold the soil and seeds. Here are a few options.
Pellets: These start as a small hard disk, when added with water they pop right up and you can place a seed in them. These are nice because they are easy to use and small so they don't take up a lot of space.
You can place them right into the soil when you are ready, you do not need to peel off the netting around them. The disadvantage is that they are quite small and I always have to plant them in something else (like a plastic cup) before planting them outside.

Peat pots: These are nice because they are a little larger. I still end up having to plant them into something else before planting outside. I like these better than the disks because I can write the name of the plant on them making it easier for me to keep track of what is planted in it. You can also place these right into soil and do not need to worry about damaging roots by pulling them out of the container. The disadvantage of these is that there is an extra step involved, they do not come with soil, so you have to fill them.

Flats: This is a container that held flowers that I bought from a nursery the year before. I was careful to pull my flowers out without damaging the container. Make sure that you thoroughly clean a container that you are re-using. There could be a disease lingering on the container that would kill your starts. Fill with a seed starting mix, and I marked mine with popsicle sticks.

Be creative. We save our yogurt containers and bring home plastic cups from parties for seed starting. It makes gardening more economical that way. For even more creative and frugal seed starting containers, check out this article. If you are recycling something like a cup, be sure to poke some holes in the bottom for drainage. About 5-6 with a thumb tack should do the trick.

C. Soil. If you bought the little dehydrated disks, you can skip this step, just hydrate your disks.
If you didn't buy the disks, don't go out and buy a 50lb. bag of potting soil. Look for a seed starter mix. It will be very light and fluffy. You can now find this at major big box stores as well as garden nurseries.
If you didn't buy the disks, don't go out and buy a 50lb. bag of potting soil. Look for a seed starter mix. It will be very light and fluffy. You can now find this at major big box stores as well as garden nurseries.

Step 2. Fill Your Containers
I have found that it is easier if moisten your seed starter mix first because it has a tendency to shrink down the first time it gets wet. Get your mix wet, then put in whichever containers you choose. I like to write the name of the plant that will be going in the container before we put the mix in.
I have found that it is easier if moisten your seed starter mix first because it has a tendency to shrink down the first time it gets wet. Get your mix wet, then put in whichever containers you choose. I like to write the name of the plant that will be going in the container before we put the mix in.

Step 3: Plant your seeds
The packet of seeds will tell you how deep to put your seeds in the soil. For those of us that have harvested seeds from the previous year and no longer have a seed packet, a good guideline is to bury them down about 3 times the width of the seed.
The packet of seeds will tell you how deep to put your seeds in the soil. For those of us that have harvested seeds from the previous year and no longer have a seed packet, a good guideline is to bury them down about 3 times the width of the seed.

Step 4: Water
We have a few different ways to water. For the disks and peat pots that we put in the plastic greenhouse containers, we bottom water. Bottom watering is when you fill the bottom of the tray with water, and the soil sucks up the water from the bottom. For containers that we can't bottom water (yogurt and plastic cups), we use a spray bottle like Mason (aka. Bubba) is demonstrating below.
We have a few different ways to water. For the disks and peat pots that we put in the plastic greenhouse containers, we bottom water. Bottom watering is when you fill the bottom of the tray with water, and the soil sucks up the water from the bottom. For containers that we can't bottom water (yogurt and plastic cups), we use a spray bottle like Mason (aka. Bubba) is demonstrating below.

Step 5: Keep them Damp and Warm
If you bought a greenhouse container it is easy, just put the lid on and stick in a warm area. If you didn't, that is okay, just use a piece of plastic wrap to cover your seeds, this will help keep the humidity in. At this point, you don't need to stick them in the sun, you will want to keep them damp and warm (about 70 degrees). So maybe place them by a heating vent or the top of your fridge, or you can purchase heating mats. I have never used the heating mats and haven't had any problems getting my seeds to sprout.
Step 6: Stick Them in a Sunny Spot
Once your seeds have sprouted, you will want to move them to a sunny spot. In the early spring, our kitchen looks like a nursery, we have plants everywhere, and I love it.
If you bought a greenhouse container it is easy, just put the lid on and stick in a warm area. If you didn't, that is okay, just use a piece of plastic wrap to cover your seeds, this will help keep the humidity in. At this point, you don't need to stick them in the sun, you will want to keep them damp and warm (about 70 degrees). So maybe place them by a heating vent or the top of your fridge, or you can purchase heating mats. I have never used the heating mats and haven't had any problems getting my seeds to sprout.
Step 6: Stick Them in a Sunny Spot
Once your seeds have sprouted, you will want to move them to a sunny spot. In the early spring, our kitchen looks like a nursery, we have plants everywhere, and I love it.
We put some on a bench in front of the sliding glass door.

Some in the window sill.

And some in a seed starting rack, modeled after Jennifer's. Click here to read that article.

Step 6: Harden Off
Once your plants are big and beautiful, you just stick them in the ground and water them, right? Wrong.
Once your plants are big and beautiful, you just stick them in the ground and water them, right? Wrong.

This part can seem scary, but don't let it intimidate you. When in doubt, take longer to harden off.
Your plants up to this point have had a cushy life. The temperature, humidity, and moisture, has been closely monitored. They have not experienced full sun, wind, or changing temperatures. Hardening off is the process of slowly getting them used to the environment they are going to move to. A typical hardening off at our home may go like this:
Your plants up to this point have had a cushy life. The temperature, humidity, and moisture, has been closely monitored. They have not experienced full sun, wind, or changing temperatures. Hardening off is the process of slowly getting them used to the environment they are going to move to. A typical hardening off at our home may go like this:
Day 1: Move plants outside in the shade for 2-4 hours on a nice day.
Day 2-5: Move plants outside for 2-4 hours in the shade and one hour in the sun making sure the weather isn't too cold or snowy.
Day 6-7: Move plants outside for 2-4 hours in the shade and 2-4 hours in the sun.
Day 8-10: Move plants outside for 2 hours in the shade and 6 hours in the sun.
Day 11-12 Move plants outside for 8 hours in the sun.
Day 13-14 Leave plants outside all day and all night in the area they will be planted. Be sure that the weather overnight won't be too cold or windy.

Hint: I like to set my alarm clock, so I don't forget to bring my plants back inside. I have fried my little plants before because I forgot to bring them in from the sun.
Step 7: Plant
Once your plants are properly hardened off, you can plant them in the ground just like you would had you bought them from the nursery. Congrats!
Step 7: Plant
Once your plants are properly hardened off, you can plant them in the ground just like you would had you bought them from the nursery. Congrats!

Enjoy the bounty that is sure to come!

Note:
There are some plants that you will not start indoors either because they won't transplant well, or because there is no need to. Some climates may be nice enough that you never have to start seeds indoors, that would be heaven! But, for Utah in order for us to get a full growing season, you have to start many plants indoors.
Some that you do not need to start indoors are, but not limited to: peas, beans, lettuces, beets, carrots, and onions.
Anyone have anything to add? Leave a comment!
There are some plants that you will not start indoors either because they won't transplant well, or because there is no need to. Some climates may be nice enough that you never have to start seeds indoors, that would be heaven! But, for Utah in order for us to get a full growing season, you have to start many plants indoors.
Some that you do not need to start indoors are, but not limited to: peas, beans, lettuces, beets, carrots, and onions.
Anyone have anything to add? Leave a comment!
~marisa


