Sunday, March 29, 2009

Seed-starting rack update

When my husband built me a seed-starting rack, we encountered doubting questions about our use of standard fluorescent bulbs. We did not, after all, use "grow lights" marketed specifically for starting seeds, but sold at a higher price than regular tubes. We decided this after reading several state extension service articles promoting the use of standard fluorescent bulbs for this purpose.

Blah, blah, blah. How about some voila instead?


These are salvia seedlings a week after I planted them. They sprouted after four days, which was awesome because the package said it would take at least 14. I also have black-eyed Susan and verbena flower seedlings so far from this same time period.

As further proof of the lights' effectiveness, the thought-for-dead houseplants I moved under the fluroescent rays are now putting out new growth. The lights work! With the flowers making a successful test run, it's now on to tomatoes and peppers and other great veggies.

This is my first year with lights, but I've done seeds for years next to windows. I enourage you to try seeds, no matter your set-up. Click here for tips.

What seeds have some of you already started indoors this season?

Jennifer

Tuesday, March 24, 2009

Backyard Farming Disasters – Pumpkin Apocalypse


NOTE: This is another in my series of articles on backyard farming disasters. When a friend read it, he said that some people will take issue with my actions. After considering this, I decide to go ahead and share it with you anyway. In the context that we use fauna for our purposes, I consider myself a pragmatic animal welfare advocate. For example, I am critical of industrial layers houses which I consider cruel – see my article Liberate the Layers – but I accept industrial broiler houses which I feel are reasonably humane. I have been in both. I think we need discussion to moderate the extreme viewpoints on both sides of the animal welfare debate. I much prefer the phrase “animal welfare” to “animal rights.” Judge for yourself my actions below.
We decided to get into pumpkin production. The first year was great. We grew about a quarter acre. The pumpkins were beautiful and they sold quickly out of the pickup bed following soccer practices. They second year promised to be just as successful. But in mid October we didn’t check the patch for about a week. When we finally went down to start harvesting for the Halloween market, we found half eaten pumpkins and deep tooth marks and gashes on all the others that were still intact. Hardly one was spared. We soon discovered the culprits, a family of groundhogs. There was hole right in the middle of the patch and several around the periphery. As we were assessing the damage, a ground hog came out of the hole and our Labrador retriever “Cinder” drew first blood. She is normally very docile & lovable but when she saw that ground hog she went after it with a vengeance like she sensed our emotions. It was a real fight for a couple of minutes before Cinder prevailed with us cheering her on. It was Herbert Spencer’s “survival of the fittest” in action. We then hooked up our irrigation system - a pump and a 2 inch hose delivering 50 gallons of water per minute out of the creek. We shoved the hose down the ground hog holes and flushed the rest of the family out in seconds and dispatched them quickly. It was very aggravating to see a whole year’s crop of pumpkins worth $500 for the kid’s hard work destroyed. Ground hogs present another more serious hazard. Their deep holes in horse pastures sometimes go unnoticed. When a horse runs across the pasture and plants a hoof in the hole, the leg snaps requiring that the horse be euthanized. If a horse has a rider, they can be thrown and seriously hurt. It is usually not practicable to trap and relocate groundhogs like it is a black snake out of a chicken coop. In my area, groundhogs thrive in natural habitats – and there are plenty of both to perpetuate the species.

Dale Johnson

Sunday, March 22, 2009

Even the President is getting his hands dirty!

Here's an article taken from CNN.com about the Obama's ew kitchen garden. Gotta love that the President and his family are following such a wonderful trend! Click on the link to see a short video with the First Lady talking about her garden.

WASHINGTON (CNN) -- Want to know where the presidential produce comes from?

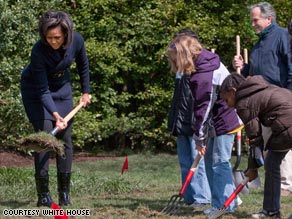
Washington's Bancroft Elementary School students help first lady Michelle Obama break ground on the garden.

Washington's Bancroft Elementary School students help first lady Michelle Obama break ground on the garden.

Take a walk past the White House. The answer may be planted right in front of you.

First lady Michelle Obama helped break ground on a new White House organic "kitchen garden" Friday. It will be the first working garden at 1600 Pennsylvania Ave. since Eleanor Roosevelt planted a so-called "victory garden" at the height of World War II.

This time, however, the enemy is obesity. The first family is hoping to send a clear message to a fast food-driven nation that often seems to be losing the battle of the bulge.

"We're just hoping that a lot of families look at us and say this is something that they can do and talk to their own kids about and think a little bit critically about the food choices that they make," said Marian Robinson, the president's mother-in-law. Video Watch Michelle Obama tell students about the garden »

The first lady told a group of Washington schoolchildren on hand for the occasion that first daughters Sasha and Malia Obama were usually more willing to try fresh fruits and vegetables because fresh produce generally tastes better.

"What I found with my kids [is that] if they were involved in planting it and picking it, they were much more curious about giving it a try," she added.

"I've been able to have my kids eat so many different things that they would have never touched if we had bought it at a store because they either met the farmers that grew it, or they saw how it was grown," she said.

"They were curious about it and ... usually they liked it."

The idea of a presidential kitchen garden, used year-round with different seasonal crops, has been strongly promoted by advocates for organic and locally grown food. They argue that the White House garden may help set a positive example for families short on time and money, who are often tempted by cheaper, highly processed food.

The presidential garden will be used, among other things, for growing such staples as butterhead and red leaf lettuce, spinach, broccoli, onions, carrots and peas.

It will also include a range of herbs, including sage, oregano and rosemary.

The garden is one of several additions to the White House South Lawn. A swing set for the first daughters was recently installed near the Oval Office.

Friday, March 20, 2009

Easy seed-starting rack


I look forward to a favorite hobby every year at this time: starting seeds indoors. I like that you can start your own plants for just a wee fraction of the cost of buying them full-grown at a nursery. Plus, there are so many more seed varieties available than nursery plants, and you can tailor them to the length of your growing season by timing when you start them. (Click here for a Backyard Farming look at the basics of starting seeds indoors.)

I’m especially excited this year because my husband Jeff built me a rack with growing lights. Previously I relied on the sun alone, but had to chase it. I engaged in a game of musical flats, moving my many seed trays to different windows throughout the day – starting on the east side of the house, on the floor next to wall-length windows, then across to the dining table in the afternoon, then on the floor so we could eat dinner, and back again. To say this process consumed our household is an understatement.

This year I knew my super curious, busy, messy 1-year-old would make short work of pots of soil on the floor. So my husband and I investigated different options for a seed rack.

We found cool commercial systems, but didn’t like the high cost: upwards of $100 for something that would fit one flat, maybe two.

Savvy marketing for such grow light systems pins on the idea that you MUST have a special bulb for your seeds, and that it must fit into their special fixture. But after doing some research with the state extension service, Jeff and I learned that standard fluorescent bulbs – a.k.a. shop lights -- work perfectly well. Ah-hah! Talk about a light-bulb moment to encourage doing it yourself!


So here’s how to make a rack:

Using boards we already had in our garage, Jeff made a simple open-backed shelf. The diagonal crosspiece on the back adds stability. He used screws, so at season’s end we can disassemble it and stuff it right back in the garage.

Our rack is slightly wider than four feet, to accommodate basic shop light fixtures. (Fluorescent bulbs are also available in two-foot lengths.) The fixtures are suspended on simple hooks from the shelf above. The chains give us the flexibility to move the lights higher as seedlings get taller. Two flats fit on each shelf. Although the top shelf isn’t equipped with a light fixture, the rack’s placement in front of a window gives me more space.

Jeff spaced the shelves so I don’t have to crouch to tend the seedlings – I can sit on the floor for the bottom one, or stand for the other. They are about 27 inches apart. Depending on how things go this season, we may alter the shelf spacing, but we decided to err on having more room for plants to grow beneath lights than not enough.

Jeff selected this type of bulb:


He thought it – ahem – interesting that the bulbs packaged as “grow” lights don’t even list their specifications on the label. Maybe it’s because then the outright comparison to standard fluorescent bulbs would be more obvious.

At the store where he shopped, one two-foot “grow” light bulb was $20 whereas each four-foot regular fluorescent tube was $5.

Our entire cost was just over $40: four bulbs at $5, two fixtures at $10, and a little bit more for the hardware and chains. I know this rack will serve us for many years.

Another option to making a rack is to buy a ready-made shelves or a bookcase, and then outfit it with the fixtures. I had fun scouring second-hand stores for this purpose – but then we remembered about our spare boards.

I’m excited to take my seed efforts to a whole new spectrum this year, and will let you know how it goes. This rack is in a room I can close off from my 1-year-old, at least until he figures out how to turn the doorknob. Wish me luck!

~Jennifer

Tuesday, March 17, 2009

The Joys of Gardening with Children

We were watching home videos from last year and we came across this video. It has made me so excited for our un-planted garden to start producing.

I apologize for the scantily clad children (it was June of last year, my kids don't wear much in the summer), my potty mouth, and the dirty window (just pretend you don't notice).


Monday, March 16, 2009

Backyard Bounty

Article from the Deseret News

SOUTH JORDAN — Six-year-old William Richmond doesn't care which came first — the chicken or the egg — as long as the shelled one is cooked just right so he can dip his toast in its yolk after eating its "white stuff."

William and his South Jordan family are part of a growing population of Utahns buying small flocks of backyard fowl this year as a supplementary food staple. Most of them cite the troubled economy as their No. 1 motivation.

And more chickens could be flocking to the suburbs if Salt Lake County loosens its zoning regulations. Currently, the county only allows chickens on properties that are at least a half-acre and zoned agricultural. The proposed change would permit up to 15 fowls in more common-sized yards, according to Bev Uipi, community relations specialist in Mayor Peter Corroon's office. The deadline for public and community councils to comment is April 1.

Before the National Bureau of Economic Research formally announced the beginning of a recession, Bud Wood, co-owner of the giant Iowa chicken farm McMurray Hatchery was working his gentle 99.5-degree incubators overtime to keep up with a sudden booming demand in spring 2008.

Besides disease concerns, new owners may want to check with county and city regulations about where they're legal, which varies enormously.

"We only get involved if there's a complaint regarding sanitation issues," said Pamela Davenport, spokeswoman for the Salt Lake Valley Health Department.

But paying off neighbors with fresh eggs is a great way to keep them mum, according to first-time chicken owner Karey Richmond, 31, who laughingly admitted to walking a few rounds "to say thank you for not complaining."

If folks like Richmond go without complaints, Davenport said the South Jordan woman will just be regulated by the city's zoning. Davenport also said the department has noticed a lot more calls lately from curious people wanting a backyard flock.

Mayor Corroon thinks it's a positive step in a trend toward more sustainable living, said spokesman Jim Braden, but it's not without its downside. Families and communities have to consider a number of things.

Avoiding illness is paramount, according to Larry Lewis, a spokesman for the Utah Department of Agriculture.

Lewis recommends that people don't mingle them with other birds. Birds often get exposed to other bird's illnesses in swap-meet like gatherings, Lewis said.


"We encourage people to get close to agriculture," he said. "We're not against backyard flocks. We certainly encourage people to grow their own gardens and raise their own foods, but there are responsibilities that go with it."

That's something Carl and Heidi Wasden of South Jordan know a little bit about. The couple raised chickens for a decade 15 years ago and just recently returned to the chore-laden lifestyle this month by purchasing a brood of eight chicks — and plowing for a large garden.

"We'd be crazy not to with the economy the way it is," Heidi Wasden said, "especially since we have the room for it here."

The Utah Department of Agriculture has information on raising chickens and safe handling of poultry on its Web site, ag.utah.gov.

Thursday, March 12, 2009

A Case for Cold


I think some of my most rewarding gardening can be done between snowstorms. I’m not talking about the storms that mark winter’s end one year and its beginning the next – that would be too easy. Naturally spring, summer and autumn are a gardener’s worksite and playground at once. Of course I love them.

Yet winter can have big payoffs, too, for very little effort.

This is what I mean. Last week it finally warmed up around here enough to melt the snow and reveal my garden plot. I checked out the container where I’d scattered spinach seeds earlier this year (I don’t even remember when, just that it was another winter day mild enough for me to not get snowed on!). Guess what – the spinach has already sprouted. I have a head start on a new spring crop for literally two seconds of work this winter.

My garden bed was buried underneath several inches of snow for most of the winter. Yet what a protective blanket it proved to be! More like an incubator that nurtured new healthy Swiss chard stems and broccoli shoots.

One plant hadn’t produced anything but a few leaves by fall’s end; I’d even forgotten what it was. So I was especially surprised to discover a beautiful head of cauliflower. It must have been forming this, beneath the snow, while I was celebrating New Year’s and Valentine’s Day. Since some of the plants leaves were damaged I’m not sure how edible it is (perhaps the extension office can advise me). No matter what, I smiled at this growth, especially today when I looked through the seed packets I'd used last year. This variety is "Snowball X."

Lessons from this winter gave me the confidence to make my other three seasons of gardening more effective. The fact that my cauliflower flourished in the cold urges me to plant this year’s crop right away. Just because I’m shivering doesn’t mean these and other cool-season plants aren’t downright cozy.

Generally we divide our planting into two groups: before and after the typical last frost date.

Cool-season plants include spinach, radishes, turnips, broccoli, cauliflower, kale, peas, lettuce and mustard greens. They can handle light to moderate frosts. In fact, these crops can't tolerate high summer temperatures, so are best planted early anyway. Beets and carrots can also be planted early, but unlike their other cool-season friends, hold up better through the summer. Cool-season crops can be planted at the end of summer for a second harvest in the fall -- even winter, as my crops showed.

So plant as soon as you can get the ground ready. If a plot isn’t prepared, try planting in pots outside.

The trick with “snowstorm gardening” is finding the lulls between storms that allow you to be outdoors to do the planting. Once the seeds are planted snow is actually a boon because of the moisture and temperature insulation it provides. And best of all, no pests!

My goal this week is to spend a few minutes planting my peas before it snows, as forecast. Then I can sit back and let the seeds do their underground magic while storms swirl overhead.

~Jennifer

Saturday, March 7, 2009

Extension: A Great Resource for Backyard Farmers


What is Extension?

Extension is the outreach of the Land Grant University in your state. In every county, the University maintains an office for University faculty members (county agents) who conduct education programs in agriculture, youth development (4H), and family & consumer science. The following are some of the Extension programs and resources that backyard farmers may find useful.

Master Gardeners - www.ahs.org/master_gardeners/index.htm

The Master Gardener program, conducted by Extension, is a two-part educational effort, in which avid gardeners are provided many hours of intense horticulture training, and in return they volunteer to help others. Master Gardeners assist with personal consulting, garden lectures, demonstrations, school and community gardening, phone diagnostic service, and other projects. You can get advice about your garden from a Master Gardner or you can be a Master Gardner and help others with their gardens.

4H - www.4husa.org/


Extension organizes 4H clubs for children ages 8-18. Each club focuses on a specific education interest, for example: gardening clubs, poultry clubs, and horse clubs. 4H clubs usually meet once a month with other activities schedules depending on project interest as well as county and state activities. One of the highlights of 4H is entering projects and earning ribbons in the annual county fair. Enroll your child in a 4H club or form your own club and be a volunteer 4H leader.

Production advice

My chickens are acting funny. My squash plants are wilting. There is a bug eating my beans. I need a soil test. Help! Your County Agent can help you with most of your problems.

Publications

With Land Grant Universities in every state employing thousands of researchers and Extension agents, there are free research based publications addressing every agriculture production method or problem. Most of the publications are free and available on the internet and are easily found with Google.
How do I find my county Extension office?
Google “Extension” followed by the name of your state. This will take you to your University Extension home page where you can then find the link to your county Extension office.

~Dale Johnson

Wednesday, March 4, 2009

Feed the Birds


Have you ever lived someplace without birds? I have, and I never realized how much I like them until I sensed their absence. I didn't put my finger on it at first, but there was something very different, very quiet about one apartment complex we lived in. Whether because it was newly constructed, I can't say, but I finally clued in that this place had no birds at all. It was eerie.

I love to hear birdsong and to see shadows flutter by my windows. I will always welome birds. I like to think that the presence of birds in my yard signals a healthy environment for everything else, too. (Well, maybe the late worm would argue with that!)

Here's an easy project to attract birds to your backyard farm, no matter what the season. These pine cone feeders are inexpensive, and fun and simple enough for very little children to make. Celebrate emerging spring by going on a nature walk to gather the pine cones.

Supplies for each feeder: pine cone, string, peanut butter, corn meal and bird seed. You may also use vegetable shortening in place of peanut butter/cornmeal mixture.

1. Tie a foot-long length of string securely around top of pine cone. This is for hanging feeder from tree branch. Be sure to do this step first, or it will be very messy to attach string when cone is slathered!

2. Mix equal parts peanut butter and corn meal. The cornmeal helps make the texture a safer swallowing consistency for the birds. Remember those grade-school peanut butter sandwiches that stuck to the roof of your mouth? Alternately, you may use vegetable shortening without the need to add cornmeal.

3. Spread peanut butter mixture onto pine cone.

4. Roll in birdseed. (A dishpan is a good container for this.)

5. Hang feeder in tree or from porch, step back and wait for your feathered friends. We tied bright red yarn near the feeder to draw attention to it. Our feeders are right outside are dining window, and I was tickled as all get out when my 1-year-old made his first sign -- for bird -- to show me what he saw one morning while eating breakfast.

Since these feeders are lightweight, you can suspend them from very tiny branches. We noticed that this helped deter the big magpies which usually bully our neighborhood; the branches didn't support their weight, but were just right for pleasant little birds. I've also had problems with rodents getting into other feeders, but not so with these.

Best of all, these feeders leave precious little mess because birds can only pick off as much as they can eat -- the birdseed doesn't get scattered all over the ground below.

~Jennifer